The information in this article is based on my personal experience and is not professional financial advice. The methods and strategies discussed may not be suitable for everyone, and your personal financial situation should be taken into account.
I used to be awful at managing my finances.
I didn’t have a system in place to track my expenses, income, or net worth. I didn’t even know what a system would look like, and barely paid any attention to the important metrics of my money. This resulted in less than desirable financial outcomes for me. You can’t improve what you don’t measure, as they say.
I eventually implemented a system, because I was tired of being broke and wanted to improve my financial situation. I educated myself through books and blogs and set up a rudimentary way to track my expenses. I was moving in the right direction, but the system was not quite there yet. It was too cumbersome and time consuming, which led to inconsistency in sticking to the process. It was also not comprehensive enough. Tracking expenses is just one piece of the puzzle. I felt dread each month when it came time to do my finances.
After some iterations and revamping over several months, I eventually landed on a system that I felt good about. A system that was efficient, low effort, and dare I say, enjoyable.
Nowadays, managing my personal finances is no longer a chore that I dread. Instead, it’s a quick and simple process that I don’t sweat and actually look forward to at the end of each month. It takes me around 2 hours of effort to handle everything on my personal finance docket, including income, expenses, net worth, and investments.
My system is not perfect by any means, and will continue to evolve along with my wants and needs. Nonetheless, I wanted to share my current process in the event that others may find it helpful. This will also force me to refine and truly understand the process myself so that I can convey it effectively.
Without further ado, here is the exact playbook of how I manage my personal finances in 2 hours of effort per month. You can also check out the YouTube video I made on the process.
Context
Before I dive into the nitty gritty, I think it is important to provide some context on my personal situation. The amount of effort it takes to manage your finances will largely depend on the level of complexity in your own financial situation.
Ultimately, what helps keep my finances manageable is that my family has a very simple financial setup. My wife and I share one single bank account. We also share one single credit card account. We both have our own credit cards that are linked to the same account. And since we buy pretty much everything with our credit cards, this funnels all of our expenses into one single bucket, making things much easier to track. Beyond this, we have a few shared investment and emergency fund accounts, and our own individual retirement accounts. And that’s pretty much it.
I highly recommend consolidating and simplifying your financial situation as much as possible. It makes everything more manageable and clear.
Setup
Another recommendation I have before jumping into a new or revised personal finance process is to wrangle all of your online financial accounts.
I personally use a password manager called Bitwarden to store all of my online account credentials. Bitwarden has a free basic tier and is a great, user-friendly tool. It is easy to set up and uses strong encryption to protect your data. You can also set keyboard shortcuts to quickly autofill your credentials as you navigate your online accounts.
I also have a simple "finance" folder on my browser that stores bookmarks for all of my financial accounts and management tools. This combination of password and bookmark management helps keep everything in my financial life organized. It also allows me to fly through my accounts at warp speed when it comes time to sit down and do my monthly finances.
Process
Part I: Tools
With those housekeeping items taken care of, let’s get down to brass tacks.
There are a number of software tools out there to help you manage your personal finances. Well, to be honest, I only actually know of one called You Need a Budget, but I know for sure there are others out there. I have signed up for a free trial of You Need a Budget a few times, but could never get fully invested in the tool. Maybe I didn’t give it enough of a shot.
My current system does not involve any paid software platforms. Instead, I use four simple spreadsheets to track and manage my finances. And I don’t even have Microsoft Office, so I do everything with Google Sheets.
You can download all four of these Google Sheets for free from my shop if you would like to open them up and follow along as we dive into the process. They are all fairly simple, and consist of a Monthly Expenses sheet, Income Tracker, Expense Tracker, and Net Worth Tracker.
The process flows from one sheet to the next, in the same order as listed above. Let’s break down each of them and get into the details.
Part II: Monthly Expenses
I sit down to hammer out my personal finances once per month, at the beginning of the month, for the month prior. So on July 1st, for example, I will sit down and crunch the numbers for June.
The first thing I do is review my Monthly Expenses sheet. This could also be considered a Monthly Budget sheet.
The purpose of this sheet is to provide a snapshot of my average monthly expenses, and an allocation of what I can reasonably spend in a given month. It is broken into two parts: fixed and variable. Fixed expenses include things like rent, car payments, and monthly subscriptions. Variable expenses include groceries, dining, automotive, and any other expenses that vary from month to month. There are a few expenses that I pay annually upfront, such as my car insurance. I break these down into a monthly amount and incorporate them into my fixed monthly expenses to keep things simple. I also notate the details of the annual expense (i.e. Paid annually in full, next due 5/1/2025) in the Notes column of the sheet.
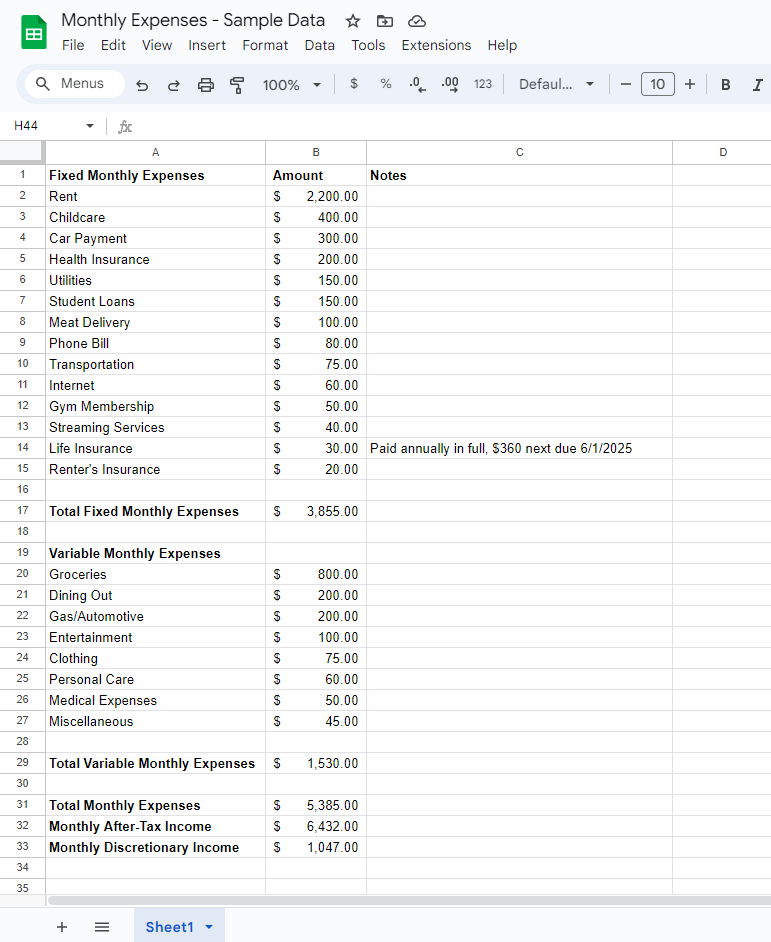
From a formula standpoint, the Monthly Expenses sheet is very basic. It calculates total variable monthly expenses, total fixed monthly expenses, and total monthly expenses. I also throw in my after-tax income (averaged out), then calculate my target monthly discretionary income (monthly after-tax income - total monthly expenses).
I don’t need to take much action on this sheet each time I run my finances. The main objective is to review my monthly burn and make sure it is fresh in my mind. Sometimes there may be a new expense I need to add, or an old one that needs to be removed. I also make a quick assessment of whether there are any expenses I want to axe from the list. Streaming services seem to be getting more obnoxious by the day with price increases, tiered ad plans, and all sorts of other nonsense. Disney+ may be next up on the fixed expense chopping block.
Part III: Income Tracker
As the name suggests, this sheet calculates and tracks all monthly income.
The sheet is separated into two main sections, pre-tax and after-tax income, and has nine simple columns.
I include columns for income from my regular W9 job, as well as a column for business income and “Other” (money from tax return, gifts, etc.). There are no fancy formulas here, just two columns that total pre-tax and after-tax income. I use the exact after-tax income amounts for my W9 job. I put 20% of all my business income away for tax savings, so for the after-tax business income column, I multiply pre-tax business income by 80% to arrive at this number.
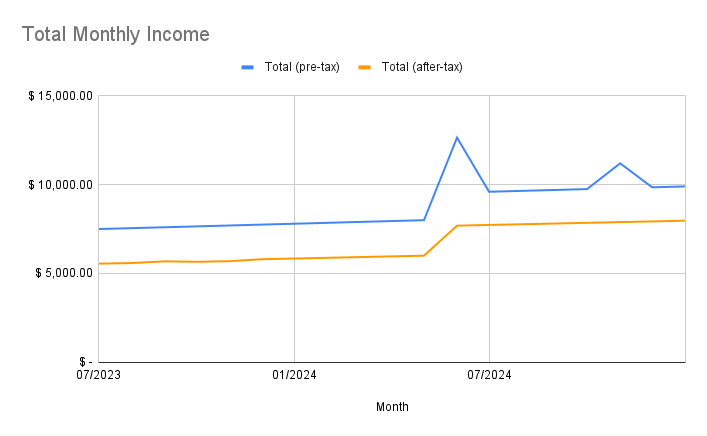
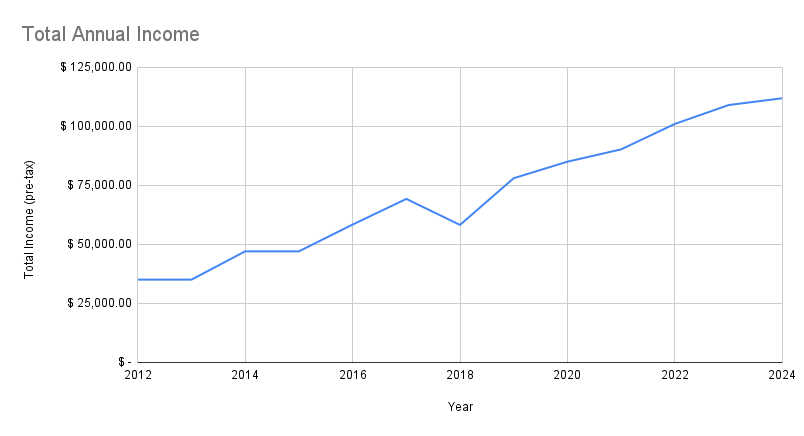
The Income Tracker also includes a separate tab to track total annual income, and charts for total monthly income and total annual income. For the annual income data, I manually update this typically after filing my taxes each year, but you could easily set up a formula to calculate the total from the monthly income amounts.
Part IV: Expense Tracker
This is where I get into the meat and potatoes of what I actually spent for the month.
The purpose of the Expense Tracker is to compile, categorize and calculate everything that I spent during the month. This feeds directly off of the Monthly Expenses sheet from Part II. If the Monthly Expenses sheet is the budget of what I can spend in a month, the Expense Tracker shows a detailed summary of how I actually did against this budget.
I store a blank template version of this sheet, then work off of a copied version for each calendar year, and rename the file for the given year (i.e. 2024 Expense Tracker).
This sheet is broken into three parts: raw transaction data, categorized expense data and discretionary income calculation. I will break down each section with tactical instructions below.
Raw Transaction Data
The first task at this step is to export my expense transaction data. As mentioned at the beginning of the article, my wife and I each have only one credit card, and the cards are connected to one shared account, which makes this step very quick and easy.
Most, if not all, credit card companies allow you to download your transaction data from your online portal. For this step, I download a CSV of my credit card transactions for the month, upload this CSV to Google Drive, then convert the file to a Google Sheet.
On the converted Google Sheet version, I then clean up the data. On my transaction files, the data includes a column with transaction date and posted date. I delete the transaction date column and keep the posted date. I also delete any rows that are accounted for in my fixed monthly expenses (more on that in a minute). The transaction data will also include credit card payments that I have made throughout the month, so I delete these rows as well. Finally, I format the columns to match exactly how the Expense Tracker columns are displayed.
Once my exported credit card transaction data has been properly cleaned and formatted, I copy and paste the data over to the Expense Tracker. Although my family does most of our spending through this single credit card account, we do sometimes have transaction activity through our checking account. Therefore, I will also comb through our checking account transaction history at this step, then manually add in any necessary expense transactions to the list.
The next task is to categorize the transactions. Since I removed any expenses that are accounted for in my fixed expenses, all of these transactions represent variable expenses and must be assigned one of the categories from the variable expenses section of the Monthly Expenses sheet from Part II. The category that is assigned must be an exact match, including case sensitivity, with how the category is listed on the Monthly Expenses sheet (you will see why in the next section).
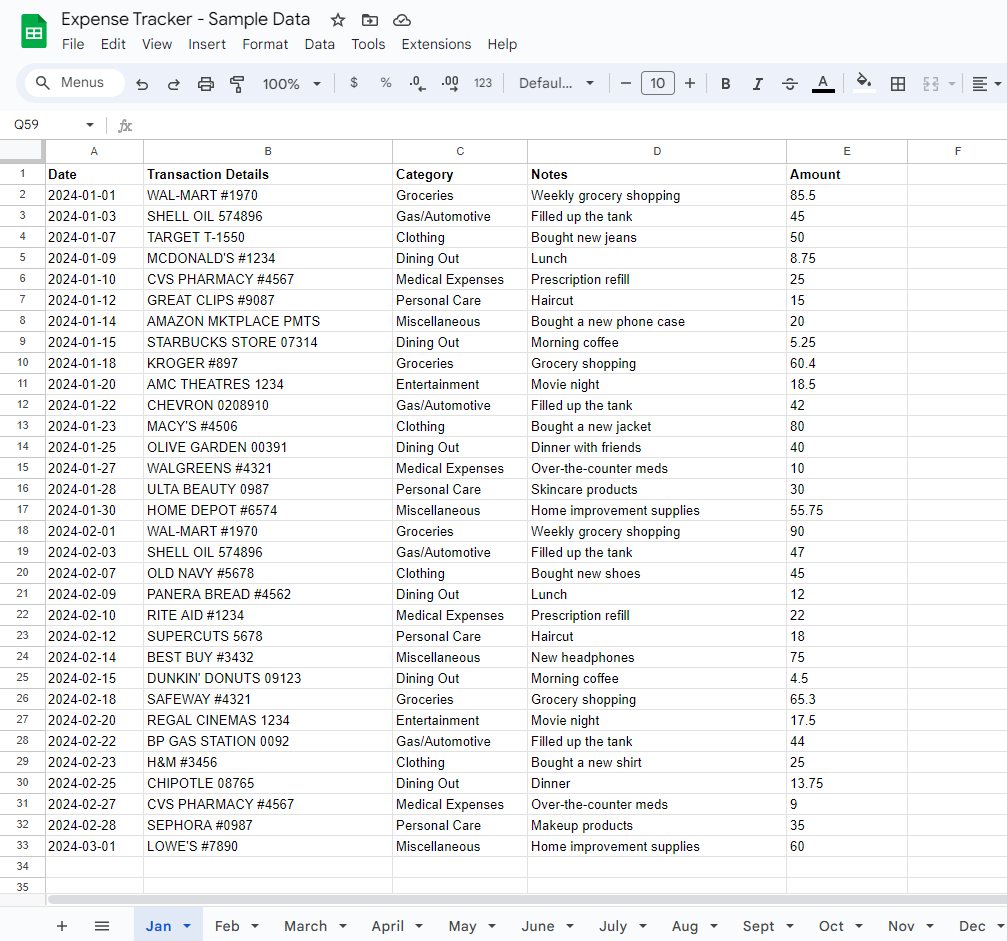
For each transaction, I quickly assess the transaction details, then assign the proper category to it. My credit card company, and many others I’m sure, will assign their own category to each of your transactions and provide this in the downloaded data. I have found it useful to incorporate their default categories in my own data, which reduces the amount of manual category updating needed. I will also sometimes include a note for a given transaction in the Notes column. I find that most transactions are easily identifiable by the transaction details provided by the credit card data. For Amazon transactions, I will open up my Amazon order history, copy the dollar amount of the transaction, then search by this transaction amount to quickly identify the details of the purchase.
Categorized Expense Data
All of the work from the previous step pays off in this one.
This section displays the fixed and variable monthly expense data from the Monthly Expenses sheet, with a slight twist. The fixed expenses section simply lists out the expense category and static dollar amount. The variable expenses section is where the magic happens. And by magic, I mean a simple SUMIF formula that calculates the totals for each variable expense category from your raw, categorized transaction data.
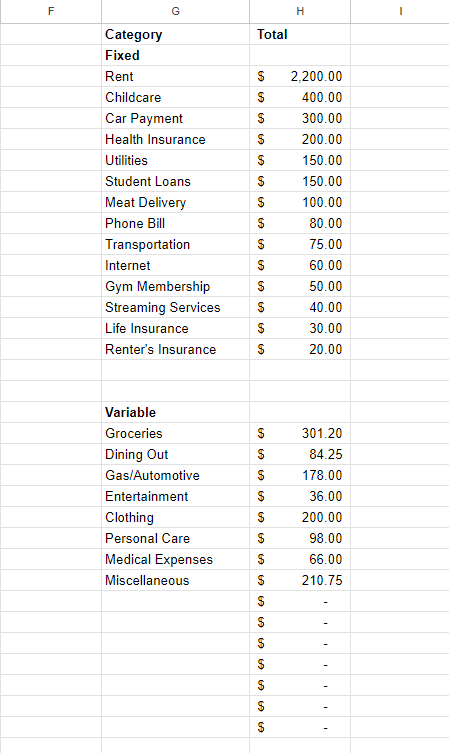
As mentioned previously, the category that is assigned to each expense in the previous section must be an exact match with one of the categories from the variable expense category list, otherwise the SUMIF formula will not work properly. Performing a quick manual audit of one of the categories from the raw data can be helpful to make sure your formula is running correctly.
Discretionary Income Calculation
This final section of the Expense Tracker is nice and simple.
Total Expenses (column J) performs a sum of all the fixed and variable expenses from column H. For Total After-Tax Income (column K), I copy and paste my total monthly after-tax income amount from the Income Tracker in Part III. Finally, Discretionary Income (column L) subtracts Total Expenses from Total After-Tax Income and displays my exact discretionary income for the month.

This is one of the moments in the process where I either pump my fist in victory, or disperse a little blast of anxiety into the pit of my stomach. The Discretionary Income calculation in column L delivers a critical message each month. Did I spend more than I took home? Or did I come out on top with some extra funds to play around with?
I have found that it is not useful to worry too much if you do end up in the red in a given month. There is an ebb and flow to our financial lives. Some months are calm and the going is easy. Other months, it feels like every possible surprise expense is popping out of the woodwork and scheming to take you down. I have also found that having the hard data to look back on and analyze is very helpful in determining where you may have overspent, and course correcting going forward. It brings me great peace of mind to know that I have a strong handle on the data, and will quickly recognize if I start veering off track.
This monthly discretionary income calculation also feeds directly into my investment process. I will assess what I have left over in discretionary income each month, then allocate some of this money into my investment accounts. I don’t currently have any auto-deposits set up for my investments. I take a manual approach based on how I did in a given month. I hope to set up some auto-deposits once I reach a more comfortable income to expense ratio.
Part V: Net Worth Tracker
This is my favorite part of the process, so I save it for last, as a treat.
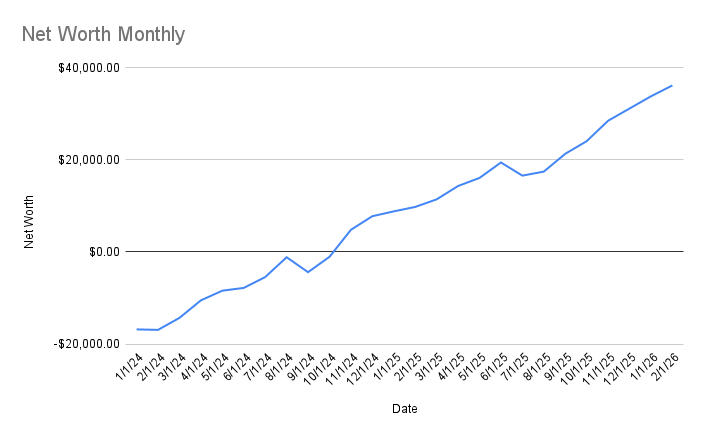
The Net Worth Tracker stores the value of my financial assets and debts, and calculates the running monthly total of my net worth. It also has a nice chart that visualizes the monthly change over time.

The process to fill in this sheet each month is very simple. I log into each of my financial accounts, then record the value of the account in the corresponding field on the sheet. As mentioned in the Setup section of this article, having all of my accounts nicely organized in a password manager and in a browser bookmark folder makes this process a breeze. It takes me around 10 minutes to populate all the data for the month.
For the assets section of the sheet, I label and arrange my accounts by liquidity. The most liquid account is listed to the far left in column B, and the rest cascade to the right in liquidity from there. Within the asset columns, I label retirement and college fund accounts in yellow to separate them from non tax-advantaged accounts, which are labeled with a blue background. The debt columns on the sheet are all labeled with a red background.
The cool thing about this sheet is that it can be used for a lifetime, if you so choose. There is just one row for each month, so even if you become a disciple of Bryan Johnson and live to be 300 years old, the sheet will easily be able to handle 3,600 rows of data.
I find that popping in to check and record my net worth once per month works well for me. It’s infrequent enough that I am not obsessing over the number, but frequent enough to provide valuable data and insights.
As mentioned at the outset, my system is not perfect. I am sure there are some gaps and flaws in there.
Nonetheless, just as with diet, exercise, or any other personal initiative, the imperfect process that you are able to stick to is far better than the perfectly polished one that you can’t maintain consistently.
If you made it this far, I hope you found something useful for your own personal finance process, or got some entertainment from my bad dad jokes. You can download all four of the sheets described in this article over at my shop, and check out the video breakdown of this article over on YouTube.